(Another) Turf/Pasture Roller Project (Yawn...)

Craig

Member
Messages
15
Good Post Points
15
Location
The Last County of Washington
Welder
Lincoln 210 tig/stic and 140c mig, Ox-gas, and a plasma torch
Howdy!

New member and this is my first post.

I've got a little project I've been building up to for many years now. Looks like it might finally come together in the next week maybe. I want a really heavy duty turf roller to tow behind my tractor, maybe my SxS too. To this end I have been collecting some tanks and barrels over the years. Looks like I'm going to be putting in a lawn here really soon so now is the time to get this project started and finished ASAP. I got serious about doing my homework and quickly realized two things.

  • The 1,000 gallon tank I have is too big for my tractor to handle.
  • Butting up two 55 gallon barrels is too big for my sXs to handle.

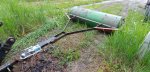
But I do have a tall & thin 80 gallon water pressure tank salvaged from a well. This should be small enough to tow with the SxS and still be heavy enough to put a knot on the heads of the gophers in the pasture. The water tank also has a lot thicker walls than the barrels which will make the entire project go more easy. As I make some progress I will share it as time allows. In the meanwhile, I learned something about taking a dent out of a barrel:

 
Messages
6
Good Post Points
5
Location
B.C. Canada
Welder
Millermatic 175
Using components I had on hand:
I built a land roller from a galvanized culvert, 24" diameter and 124" long. to be filled with water to get some weight.
and towed behind my seed drill.
The ends are 10 gauge galvanized, welded continuously inside the culvert.
I have a 1" npt coupler welded in, that is the water fill hole.
Axles are 1 7/16" diameter shafts that are inset into the 10 gauge ends, so that I could weld them inside and out.
Overall, the concept works well as a land roller, but there are problems to iron out.

Mistakes:
- should have included a second threaded opening to let air out when filling with water
- should have used a flush mount plug in that opening
- should have thought out the angle iron towing frame a little more before I built it, the pillow block bearings I used worked great while travelling in a straight line,
but as soon as I began to turn they allowed too much movement (i.e. 'twisting') I tried to mitigate that with 3/4" x 3" UHMW rub blocks held in place by steel brackets.
That worked for a while, until the twisting forces overcame everything and the whole contraption ended up at the side of the field while I finished seeding.

Back to the drawing board, as they say
 

Craig

Member
Messages
15
Good Post Points
15
Location
The Last County of Washington
Welder
Lincoln 210 tig/stic and 140c mig, Ox-gas, and a plasma torch
I got in a full day of work with the roller project on Sunday. It is now ready to be filled with concrete. I plan to do that on Wednesday. Here are a couple photos:

Hole cut from end for easy filling with concrete.
20200510_151903_HDR.jpg
When the last bucket of concrete goes in I will use some tape and the cut-out to form the concrete to the end dome shape. I will weld it on after the concrete has cured.

(I don't know why this photo is sideways?!) This is the roller standing on a tire rim I tack welded on. This is how it will stand while I fill it with concrete.
20200510_171321.jpg

The plan is to position the roller between the ramps of the vehicle lift while we fill it with concrete. After the concrete has cured I will use chain to secure the roller to the lift so it can be tipped and lowered under control.
 

Craig

Member
Messages
15
Good Post Points
15
Location
The Last County of Washington
Welder
Lincoln 210 tig/stic and 140c mig, Ox-gas, and a plasma torch
pouring concrete.jpg
dumping concrete.jpg
Here we are packing the roller with concrete. We did this last week, on Thursday. Tomorrow, the following Wednesday, we plan to lower the roller onto the floor. Even though the concrete is suppose to be 'set' in just 24 hours I want to give it every minute I can to let it strengthen before I put any stress to it. But to be honest, I am more concerned about dropping the roller and breaking my floor than I am about breaking the roller!
 

Craig

Member
Messages
15
Good Post Points
15
Location
The Last County of Washington
Welder
Lincoln 210 tig/stic and 140c mig, Ox-gas, and a plasma torch
Had a major achievement here today!


Most important thing about today is nobody got (severely) injured.

2nd most important thing about today is I didn't break my concrete floor!

But that roller is a heavy SOB! I was welding on the fill cap and stopped to reposition the roller by 1/4 rotation. As I am moving the roller I pull back my left foot but my heel caught on something and the roller used my big toe as a chock! OUCH.
 

Craig

Member
Messages
15
Good Post Points
15
Location
The Last County of Washington
Welder
Lincoln 210 tig/stic and 140c mig, Ox-gas, and a plasma torch
This project is done, but not yet finished. Today we completed assembly then went for a shake-down thrashing around the pastures and lawn for about an hour. A quick look-over didn't reveal any failures. We expect some dry weather and heat in a few days so I will use that opportunity to throw on some blue paint. It was raining really hard and I didn't want to take my phone into the weather for more photos/video so, this is all I have to share for right now.

As for total cost of this project, I have $50 bucks in the pillow block bearings and I paid a whole lot more to get them right now locally than if I had waited to order them on-line, but the shipping times were into the weeks so I pony'd up to have them in my hand ASAP.

The axle and the tube at the front of the frame is from some stock I got a couple years ago just to keep around for this kind of project. I might have $30 bucks between the two.

The concrete costs about $85 bucks.

And I had to buy some hardware and that costs almost $5 bucks.

I don't know what to factor in for consumables & shop electricity? Not much, though, my electricity is really cheap and my weld supply is hard to beat also. Call it $10 bucks I guess.

So that is
$50
$30
$85
$5
+$10___
=$180 bucks

I have no doubt if I had more time to wait for shipping I could have gotten the bearings for about $15 bucks, instead of $50. If so, that would have dropped my total cost in this project to about $145 dollars.
-----------------------------------------------------------------------------

I do not get to weld much and this project had a lot of welding. Also, most of the welding I do is on 1/4" or thicker metal and that is pretty easy stuff. This project was challenging in that I had to get tuned-up on welding thin material and I also had several locations that required welding thin to thick, which is another challenge.

I enjoy watching welding educational videos on-line and all of that 'watching' really pays off when it is time to weld - it is kind of like 'artificial practice'. All that watching of welding videos let me confidently jump in welding thin to thick, and know what to look and listen for when welding thin to thin.

Overall this was a very fun project and now I want to do more in my workshop.
 

Attachments

  • Turf Roller.jpg
    Turf Roller.jpg
    538.4 KB · Views: 16

Craig

Member
Messages
15
Good Post Points
15
Location
The Last County of Washington
Welder
Lincoln 210 tig/stic and 140c mig, Ox-gas, and a plasma torch
This will be my last review of the turf roller. I might follow up with another video showing it in action...
 
Top