Just built this gravel spreader

olddude

New member
Messages
4
Good Post Points
2
Location
Richmond Va.
Welder
Miller Dynasty 300 DX, Millermatic 252
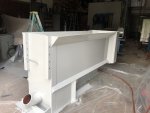
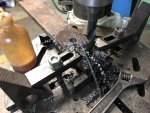
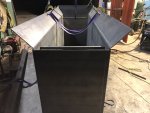
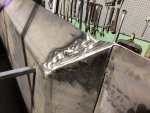
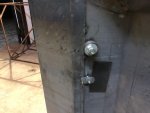
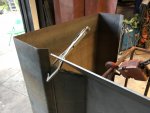
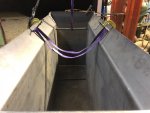
A buddy was looking for a way to put gravel down in septic field ditches that was better than the old way of dumping it in the ditch and spreading it by hand. I looked around and found one on a job site and asked the guys if I could take a few pics and measurements of their box. They said sure go ahead so I looked it over, took some measurements and came up with a build plan. I ordered the material and got them to brake the metal at a couple critical points to maybe help cut down on cutting and welding once the material was at my shop. I hand sketched some drawings of what I wanted and got to it.

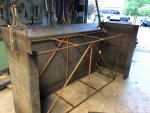
The critical part is having the spreader lay down the correct amount of stone under the pipe and then cover it with the right amount on top. I also added a roller unit later for covering the ditch with protective paper before they back fill the ditch all in one pull down the ditch.

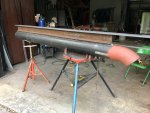
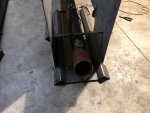
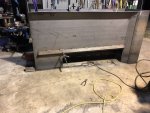
I first started with the under carriage with the pipe that feeds the drain tile into the ditch. These pics are the start and the finish and I'll post some more a little later.
 

Attachments

  • Bart's gravel spreader 037.jpg
    Bart's gravel spreader 037.jpg
    499.3 KB · Views: 139
  • touch up time.jpg
    touch up time.jpg
    319.2 KB · Views: 126

olddude

New member
Messages
4
Good Post Points
2
Location
Richmond Va.
Welder
Miller Dynasty 300 DX, Millermatic 252
Looks like a great idea. Got any action vids?
No vids but I did take a lot of pics along the way. I'm having trouble finding a lot of them though. I'll post what I can find and hopefully I can find the rest. I used three different cameras and the ones I took on my cell phone are the ones that I can't find. These are a few I found but not really good as far as photo quality. Hopefully I can get some more that show a little more detail.
 

Attachments

  • drilling holes for the pull bar.jpg
    drilling holes for the pull bar.jpg
    587.6 KB · Views: 56
  • Bart's gravel spreader 028.jpg
    Bart's gravel spreader 028.jpg
    474.4 KB · Views: 54
  • Bart's gravel spreader 031.jpg
    Bart's gravel spreader 031.jpg
    401.6 KB · Views: 49
  • Bart's gravel spreader 025.jpg
    Bart's gravel spreader 025.jpg
    489.6 KB · Views: 45
  • Bart's gravel spreader 032.jpg
    Bart's gravel spreader 032.jpg
    510.3 KB · Views: 47
  • Bart's gravel spreader 033.jpg
    Bart's gravel spreader 033.jpg
    303.8 KB · Views: 43
  • Bart's gravel spreader 027.jpg
    Bart's gravel spreader 027.jpg
    449.4 KB · Views: 47
  • Bart's gravel spreader 036.jpg
    Bart's gravel spreader 036.jpg
    372.7 KB · Views: 45
  • Bart's gravel spreader 029.jpg
    Bart's gravel spreader 029.jpg
    498.8 KB · Views: 49
  • Bart's gravel spreader 034.jpg
    Bart's gravel spreader 034.jpg
    363.6 KB · Views: 58

olddude

New member
Messages
4
Good Post Points
2
Location
Richmond Va.
Welder
Miller Dynasty 300 DX, Millermatic 252
Very cool, interested to see how you do this.

Aaron Z
Like I was telling Dave the pics are not too great but hopefully you can get something out of this. There are 5 main parts to this the way I decided to go about it. I got the metal company to break as much of it that they could and basically I just put all the pieces together like a big puzzle. I had the two sides with the flares on the top then the two end pieces. They kind of messed up a little and cut the flared ends on the two sides too short which meant I had to fill in a lot in the back part where it widens out and those pieces came together on the top. That was just a minor day and a half setback.

Once I got the bottom runner with the big 6 inch pipe attached to it built I could then marry the running gear to the box. There was a lot of thinking and a few/.....bunch of Bud Lites tilted upward going on when I put these two pieces together. I sure didn't want to have to cut this thing up and have to redo it so it had to be right on. I didn't make but one mistake in putting them together but in the end it didn't matter.

I guess I forgot one basic rule when working with metal and how sometimes no matter how careful you are when welding metal will warp out of shape. A large piece of threaded rod and a couple big azzed nuts pulled it all together where it was supposed to be before I welded the bottom pieces together. I still had about 3/8's of an inch difference from one side to the other but a little filler on the wide side and no one but me will ever know the difference.

There was a lot of welding that went on during this build. I used a whole 33lb roll of solid gas shielded .045 wire and about 1/4 of a roll of .045 flux core to put it all together. Most of the problems I encountered were due to me working by myself when piecing this thing together. A second set of eyes would have been nice at times. My oldest son helped me some in the evenings welding and I cut out and made different parts during the day, then tacked welded them together so we would have plenty to weld on at night.

Some of these parts were made out of 11/4 inch thick plate like the lifting eyes and some of the parts on the front end where the pulling attachment is. Drilling those big 3/4 and some 1 inch holes could have been a real pain but I have an old 3HP drill machine that didn't even grunt at all when I laid those big plates up on the table.

I'll get together some more later but for now I gotta go.
 
Top