As a follow up on the failed welds... once we removed the railing, the whole unit had a bit of flex to it and that movement basically got all of the baulesters swaying and that was enough to break some welds. Also we tried a three person job with only two people so it wasn't as stable as I had envisioned it would be. Oh well, lesson learned.
You are using an out of date browser. It may not display this or other websites correctly.
You should upgrade or use an alternative browser.
You should upgrade or use an alternative browser.
Welding a wrought iron railing
- Thread starter MC
- Start date
Gary Fowler
Well-known member
- Messages
- 717
- Good Post Points
- 202
Well the welds certainly look better. Try a little side to side weave with it so as to make your beads wider and a bit flatter. When welding in a groove, anything above 1/16" is not adding any strength to the product and if really tall could be inducing stress into the weld.
Gary Fowler
Well-known member
- Messages
- 717
- Good Post Points
- 202
If you use a heavy extension cord with at least 12 gauge wire, you can work the FC 125 just as well as if it is plugged into the receptacle. I welded some bracing on my fence post using 100 feet of cord still using the G7 setting and I couldnt tell any difference in the welding from when it was plugged into the wall outlet.@Gary Fowler The unit i have has low and high settings but I was using an extension cord out of necessity. I only have a couple 20amp circuits in my house right now so getting to the back yard with 20amp requires an extension cord. I will I the speed and use some cooking spray next time.
If you use a heavy extension cord with at least 12 gauge wire, you can work the FC 125 just as well as if it is plugged into the receptacle. I welded some bracing on my fence post using 100 feet of cord still using the G7 setting and I couldnt tell any difference in the welding from when it was plugged into the wall outlet.
I'm using a 25 foot 20 gauge plugged into a 20 amp.
My only issues are related to welding these really weird angles without much metal on metal contact. So as I try to get a bead started sometimes the arc is jumpy. But like I said that's because of the contact or lack thereof. When I'm just welding a flat or right angle it's working out pretty well for a total newbie.
Thanks for the tip on the bead width.
This is where I left off today. Another day of re-doing work due to inexperience. The newell posts are secured with lags and the baulesters are set in epoxy on the treads and welded to the railing.
Once I finish the final dozen baulesters I'll wire brush everything and grind down what I can. Hopefully the spatter can get removed with a brush but the angles are pretty tight for a flap wheel on a grinder. I kind of need some sort of v pointed cone flap grinder to get in there. I figure I'll clean it up as best I can and then once painted the ugly welds will make for good stories if anybody gives me a hard time about it.
Once I finish the final dozen baulesters I'll wire brush everything and grind down what I can. Hopefully the spatter can get removed with a brush but the angles are pretty tight for a flap wheel on a grinder. I kind of need some sort of v pointed cone flap grinder to get in there. I figure I'll clean it up as best I can and then once painted the ugly welds will make for good stories if anybody gives me a hard time about it.
Attachments
California
Well-known member
That's going to be gorgeous!This is where I left off today.
... angles are pretty tight for a flap wheel on a grinder. need some sort of v pointed cone flap grinder
I'll clean it up as best I can and then once painted the ugly welds will make for good stories
I have HF's jumbo Dremel. This might be helpful to get into tight spots.
If you are going to paint everything and it should look smooth - Bondo (autobody filler) is your friend!
")
That's going to be gorgeous!
I have HF's jumbo Dremel. This might be helpful to get into tight spots.
If you are going to paint everything and it should look smooth - Bondo (autobody filler) is your friend!
Yeah I have used bondo many times as a secret weapon. Might have to bust it out this time too.
CA_Bgrwldr
Well-known member
Here's a weld I did with the DC titanium flux 125 on voltage I and speed 6, which seems to be pretty good. This is with a quick wire brush by hand after the weld. I'm pretty sure this weld would be impossible on the standard AC flux 125. I can definitely feel much better control and penetration with the titanium 125. I also like the light weight.
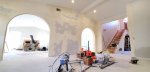
Today was a day of reckoning on the railing. My plan of removing the railing and then painting is not going to work. I removed it and a bunch of the tack welds failed and we lost some baulesters during transport. Rather than try to line everything up and deal with fitting 28 baulesters on a 200lb railing, I'm going to just fabricate and paint everything inside. It will be messier if I need to do a lot of grinding but I think it's the only way with my design incorporating the baulesters directly into the stair treads. If the whole railing unit had a bottom rail then it would be a no brainer to fabricate separately and then install. That bottom rail would also have provided more integrity.
You could sandwich the balusters between 2"x2"x8' wood strips screwed together. If needed a couple of diagonal braces should keep everything in place during removal and installation.
You could sandwich the balusters between 2"x2"x8' wood strips screwed together. If needed a couple of diagonal braces should keep everything in place during removal and installation.
Thought about that. After the fact of course.
Took the day off today. Will resume tomorrow. Hey wait I thought I was going to finish this last weekend?
CA_Bgrwldr
Well-known member
Yeah I have used bondo many times as a secret weapon. Might have to bust it out this time too.
For small stuff like that, I like to use glazing putty, no mixing, no issue with it curing faster than you can apply it, and easy to sand.
Gary Fowler
Well-known member
- Messages
- 717
- Good Post Points
- 202
Just grind off all that old weld that you put on with the Chicago Electric and reweld with the Titanium and it will look good. Set it on G7, no need to go higher but maybe lower if you have thin components. If it is truly solid wrought iron, G7 will work just right.Yeah I have used bondo many times as a secret weapon. Might have to bust it out this time too.
I was never a fan of covering up something with putty that is permanent fixture.
California
Well-known member
I agree re-weld and get everything structurally solid.I was never a fan of covering up something with putty that is permanent fixture.
But this is a location where people will slide their hand down the surface of the rail for the life of the house. Any imperfection will be noticeable. After getting it competently welded, I would use autobody final finishing techniques to make the surface flawless.
I say this because I have noticeable imperfections in the stair handrail I varnished when I added the second story in 1988. I didn't realize some varnish ran and made uneven small dribbles on the underside of the rail, that remain noticeable as you slide your hand down the handrail even today. I should have sanded the bumps off and revarnished the underside but I never have. When its possible to make a job seem non-amateurish I try to make that extra effort.
I agree re-weld and get everything structurally solid.
But this is a location where people will slide their hand down the surface of the rail for the life of the house. Any imperfection will be noticeable. After getting it competently welded, I would use autobody final finishing techniques to make the surface flawless.
I say this because I have noticeable imperfections in the stair handrail I varnished when I added the second story in 1988. I didn't realize some varnish ran and made uneven small dribbles on the underside of the rail, that remain noticeable as you slide your hand down the handrail even today. I should have sanded the bumps off and revarnished the underside but I never have. When its possible to make a job seem non-amateurish I try to make that extra effort.
I picked up a few different flap discs plus sanding paper, and a pointed cone drill bit attachment. I know it won't be pretty on the underside unless I spend dozens and dozens of hours on it so I'm probably going to settle for "good enough" this time.
Gary Fowler
Well-known member
- Messages
- 717
- Good Post Points
- 202
The first lesson I learned when I started welding for a living was that you cant weld over an ugly weld to make it pretty. It just becomes larger and the abnormalities just become larger abnormalities. So if something is not to your liking, grind it down to smooth it out then reweld if necessary. If necessary meaning that you had to grind most of the weld metal off to correct the issue. Sometimes just grinding off the lumps can make it presentable.
The first lesson I learned when I started welding for a living was that you cant weld over an ugly weld to make it pretty. It just becomes larger and the abnormalities just become larger abnormalities. So if something is not to your liking, grind it down to smooth it out then reweld if necessary. If necessary meaning that you had to grind most of the weld metal off to correct the issue. Sometimes just grinding off the lumps can make it presentable.
Yeah I already learned that if it's so ugly that it needs to be ground off completely, it needs a new weld. If you want it to be nice looking that is.

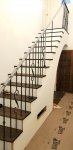
First coat of flat black rust-oleum ultra cover premium paint. Brushed it on. I'll do one more coat. I'm no longer concerned with the appearance of the welds as they are nearly impossible to see unless you get your face right up to the weld. Good thing I didn't spend much time grinding!
I'm also quite happy with the stability of the railing, considering that the individual baulesters are not tied together. Code requires the railing support 200lbs which I'm sure it will, but I'm not about to go hanging on it to prove the point a day after finishing it. The railing that this replaced was quite wobbly and only tied into the stair risers with a few screws. The whole thing came apart with some vigorous shaking. My railing would require some tools and I think it would put up a good fight.
Will be completely wrapped up tomorrow, only 6 days late.
Attachments


California
Well-known member
Looking good!
Gary Fowler
Well-known member
- Messages
- 717
- Good Post Points
- 202
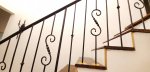
Now to learn how to mud in the sheetrock and sand it smooth, repaint the area around the stairs. Stairs look good.
Now to learn how to mud in the sheetrock and sand it smooth, repaint the area around the stairs. Stairs look good.
Yeah that's on the list already. I hung about 40 sheets in this house already. Did all of the mud and taping myself. This wall was so smooth I was considering smoothing the texture in the entire house but didn't have time to bite that much off considering everything else on the to-do list. But yes the side of the stairs will get done soon.